Introduction
In today’s enterprise environments, password-based Wi-Fi authentication is simply not enough. Credential theft, phishing, and unauthorized device access are constant threats. The gold standard for securing wireless access is certificate-based EAP-TLS authentication, where only managed, trusted devices with valid certificates can connect to your network.
In this blog, I walk through a real-world deployment, integrating Microsoft Intune’s SCEP Certificate Connector with Aruba ClearPass Policy Manager to enforce certificate-based authentication on a corporate SSID, complete with OCSP and CRL validation for real-time certificate revocation checking.
Architecture Overview
Before diving into the steps, here is the full architecture of what we built. Every component plays a specific role from certificate issuance in the cloud all the way to RADIUS enforcement at the wireless layer.
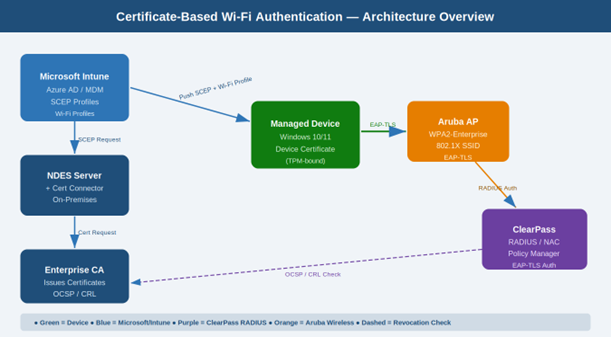
| Deployment Components at a Glance | |
| MDM Platform | Microsoft Intune (Azure AD-joined devices) |
| Certificate Authority | Microsoft NDES (Network Device Enrollment Service) |
| Certificate Connector | Intune Certificate Connector (SCEP) |
| NAC / RADIUS | Aruba ClearPass Policy Manager |
| Auth Protocol | EAP-TLS (certificate-based 802.1X) |
| Revocation Checking | OCSP (primary) + CRL (fallback) |
| Target SSID | Corporate WPA2-Enterprise SSID |
Why Certificate-Based Authentication?
Before the steps, here is why EAP-TLS with device certificates is far superior to username/password methods like PEAP-MSCHAPv2:
- No credential theft risk – there is no password to phish or steal.
- Device identity assurance – only Intune – managed devices receive certificates.
- Seamless UX – users connect automatically with zero password prompts.
- Instant revocation – lost or decommissioned devices can be cut off immediately.
- Zero Trust alignment – only known, healthy, managed devices gain access.
Certificate Enrollment & Connection Flow
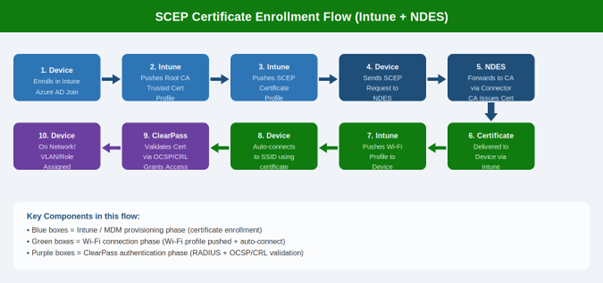
The diagram below shows the full 10-step flow from device enrollment in Intune all the way to network access being granted by ClearPass. Understanding this flow is essential for troubleshooting.
Step 1: Set Up NDES (Network Device Enrollment Service)
NDES is the Microsoft server role that bridges Intune and your internal CA. It implements the SCEP protocol, allowing devices to request certificates without direct CA access.
Prerequisites
- Dedicated Windows Server 2016+ for NDES – never install on the CA server itself.
- NDES service account with Enroll permissions on the certificate template.
- Enterprise CA already configured and operational.
- SSL certificate for the NDES server accessible over HTTPS.
Key Installation Steps
- Install the NDES role: Server Manager > Add Roles and Features > Active Directory Certificate Services > Network Device Enrollment Service.
- Configure the NDES service account with Enroll permissions on your device certificate template.
- Create a certificate template: duplicate the Workstation Authentication template, set Subject Name to Supply in the request, enable Client Authentication EKU.
- Publish the certificate template on your CA.
- Configure NDES to use the template via the registry: HKLM\SOFTWARE\Microsoft\Cryptography\MSCEP.
- Verify NDES is accessible over HTTPS: https://<NDES_FQDN>/certsrv/mscep/mscep.dll
Step 2: Install the Intune Certificate Connector
The Intune Certificate Connector is installed on the NDES server and acts as the relay between Intune’s cloud service and your on-premises CA. This is the critical piece that enables Intune to push SCEP certificate requests from enrolled devices to your CA.
Installation Steps
- In Intune Admin Center, go to: Tenant Administration > Connectors and Tokens > Certificate Connectors.
- Click Add and download the Certificate Connector installer (IntuneCertificateConnector.exe).
- Run the installer on your NDES server. Sign in with an Intune Administrator account when prompted.
- Select the SCEP certificate option during setup (add PKCS if needed).
- Complete the installation. The connector registers automatically with Intune.
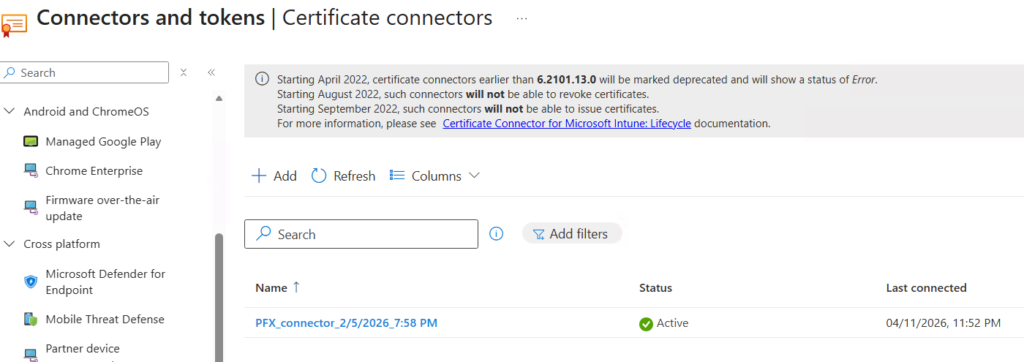
- Back in Intune Admin Center, verify the connector shows as Active with a green status under Certificate Connectors.
Step 3: Configure SCEP Certificate Profile in Intune
With NDES and the connector running, create the SCEP certificate profile in Intune. This tells devices what type of certificate to request and where to request it from.
3.1 – Trusted Certificate Profile (Root CA)
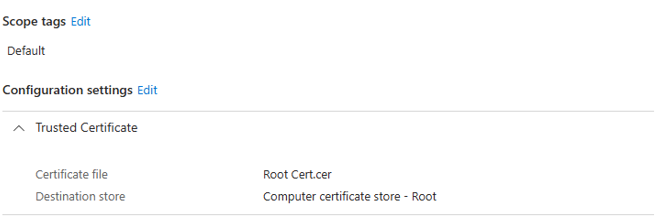
First, deploy your Root CA certificate to devices as a Trusted Certificate profile so devices trust certificates your CA issues.
- Intune Admin Center > Devices > Configuration Profiles > Create Profile.
- Platform: Windows 10 and later. Profile type: Templates > Trusted Certificate.
- Upload your Root CA .cer file and assign to the target user/device group.
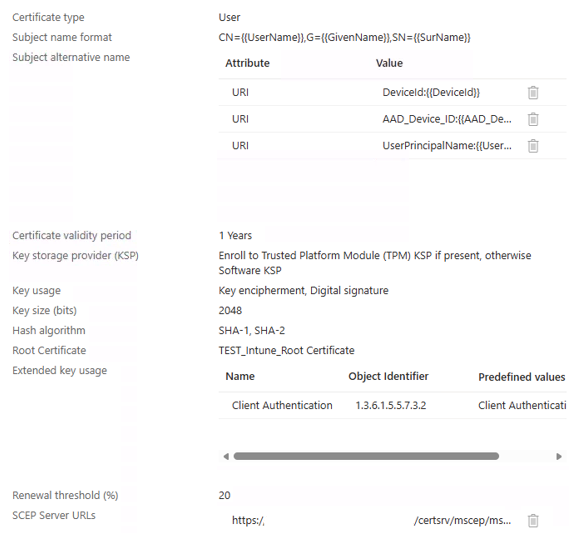
3.2 – SCEP Certificate Profile
- Create a new profile: Platform: Windows 10 and later. Profile type: Templates > SCEP Certificate.
- Certificate type: Device (machine-based auth, not user-based).
- Subject name format: CN={{DeviceId}} – embeds device identity in the certificate.
- Subject alternative name: URI = {{AADDeviceId}} for additional device identification.
- Certificate validity period: Set your desired duration (e.g., 1 year).
- Key storage provider: Enroll to TPM KSP — certificate private key is hardware-bound and cannot be exported.
- SCEP Server URLs: Enter your NDES URL – https://ndes.yourdomain.com/certsrv/mscep/mscep.dll
- Assign the profile to your user/device group and save.
Step 4: Configure the Wi-Fi Profile in Intune
This is the step that ties everything together on the device side. The Intune Wi-Fi profile tells managed devices which SSID to connect to, what authentication method to use (EAP-TLS), and which certificate to present. Without this profile, devices will not know to use the certificate for Wi-Fi authentication.
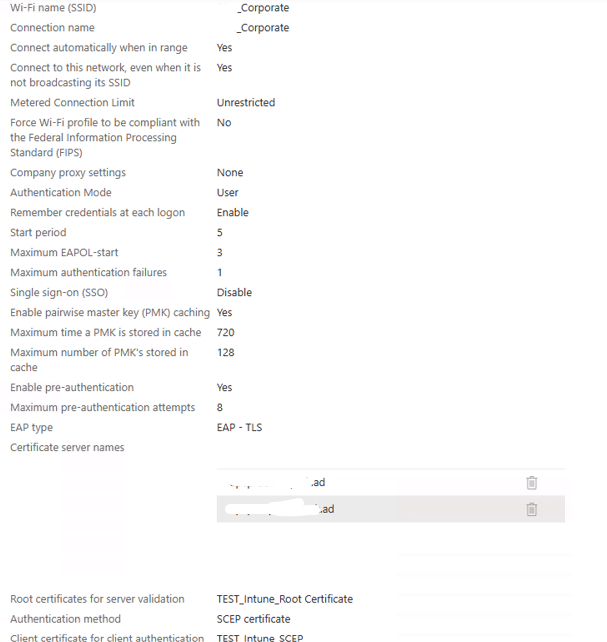
Create the Wi-Fi Configuration Profile
- In Intune Admin Center, go to: Devices > Configuration Profiles > Create Profile.
- Platform: Windows 10 and later. Profile type: Templates > Wi-Fi.
- Wi-Fi type: Enterprise.
- Wi-Fi name (SSID): Enter the exact SSID name of your corporate wireless network (e.g., Corp-WiFi).
- Connection name: Enter a friendly display name for the connection (e.g., Corporate Wi-Fi).
- EAP type: Select EAP-TLS.
- Certificate server names: Enter the FQDN of your ClearPass server (e.g., clearpass.yourdomain.com). This prevents rogue RADIUS server attacks.
- Root certificates for server validation: Select the Trusted Certificate profile you created in Step 3.1.
- Client Authentication — Certificate type: Select Device certificate.
- Client Certificate: Select the SCEP Certificate profile you created in Step 3.2.
- Assign this Wi-Fi profile to the same user/device group as the certificate profiles.
Note: Make sure to assign all three Intune Profiles to same USER or DEVICE group. (specifically the Root certificate profile and SCEP profile)
What Happens on the Device
Once all three profiles are received by the device (Trusted Cert, SCEP Cert, Wi-Fi), the following happens automatically:
- The SCEP profile triggers a certificate request to NDES, and the device receives its machine certificate.
- The Wi-Fi profile configures the wireless adapter to connect to the SSID using EAP-TLS.
- The device connects to the SSID automatically – no user interaction required – and presents the machine certificate to ClearPass for authentication.
Step 5: Configure Aruba ClearPass Policy Manager
ClearPass is the RADIUS/NAC platform that enforces authentication at the network layer. When a device connects to the SSID, the wireless controller forwards the auth request to ClearPass, which validates the certificate and applies policy.
5.1 – Import Root and Intermediate CA Certificates
- In ClearPass, go to Administration > Certificate Store > Trust List.
- Import your Root CA and any Intermediate CA certificates. ClearPass must trust the issuing CA chain to validate device certificates.
5.2 – Create the RADIUS Service
- Navigate to Configuration > Services > Add Service.
- Service type: 802.1X Wireless. Name it after your SSID (e.g., CorpSSID-EAP-TLS).
- Under Authentication, select EAP-TLS as the allowed EAP type.
- Add a certificate-based authentication source.
5.3 – Authentication Method
- Go to Configuration > Authentication > Methods > Add.
- Select EAP-TLS. Link it to your imported CA trust list.
Enable OCSP verification (configured in Step 6).
5.4 – Enforcement Policies
- Go to Configuration > Enforcement > Policies > Add.
- Set conditions based on certificate attributes (e.g., CN contains corp) or AD group membership.
- Set enforcement profiles to assign VLAN, ACL, or role to authenticated devices.
5.5 – Add the Wireless Controller as a Network Device
- Go to Configuration > Network > Devices > Add.
- Add your Aruba wireless controller. Set the shared secret and vendor (Aruba).
Step 6: Configure OCSP and CRL Revocation Checking
Certificate revocation checking ensures ClearPass rejects certificates that have been revoked – even if they are not yet expired. This is your kill-switch for lost, stolen, or decommissioned devices.
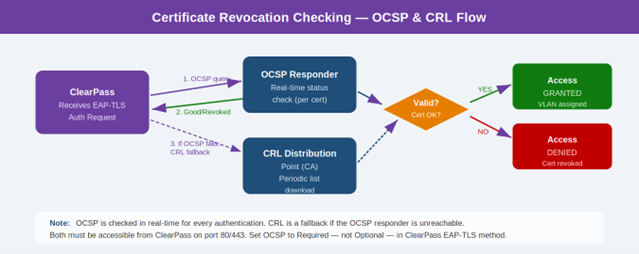
| OCSP vs CRL – Comparison | |
| Method | Description |
| OCSP | Real-time per-certificate check. ClearPass queries the OCSP responder on every auth. Fast and current. |
| CRL | Periodic file download. ClearPass downloads a list of revoked certs from the CA. Works offline but less real-time. |
| Recommended | OCSP as primary with CRL as fallback – best of both worlds. |
Configuring OCSP on ClearPass
- In ClearPass, go to Administration > Certificate Store > OCSP Configuration.
- Add the OCSP responder URL from your CA (found in the Authority Information Access extension of issued certs).
- Set the OCSP check to Required – this ensures certs without a valid OCSP response are rejected.
- In your EAP-TLS authentication method, enable OCSP checking and link it to the OCSP responder.
Configuring CRL as Fallback
- Ensure your CA publishes CRLs to an accessible HTTP location (not LDAP – ClearPass needs HTTP).
- Verify the CDP (CRL Distribution Point) URL from your CA’s certificates is reachable from ClearPass.
- Configure ClearPass to fall back to CRL if the OCSP responder is temporarily unreachable.
Step 7: Configure the Wireless SSID on the Controller
Configure the SSID on your Aruba wireless controller to use ClearPass as the RADIUS server for 802.1X authentication.
- On your Aruba controller, configure the SSID security as WPA2-Enterprise (802.1X).
- Set the Primary RADIUS server to your ClearPass management IP or cluster VIP.
- Set the RADIUS shared secret to match what you configured in ClearPass.
- Enable RADIUS accounting for session tracking in ClearPass.
- Set the NAS-Identifier to a meaningful name (e.g., corp-wifi) – used in ClearPass service matching rules.
- Apply the SSID to the appropriate AP groups.
Step 8: End-to-End Testing
Run thorough end-to-end tests to validate every layer before declaring success.
Certificate Deployment Test
- Enroll a test device in Intune and confirm the SCEP certificate is deployed (Settings > Certificates on the device).
- Verify the certificate subject name and SAN match the SCEP profile settings.
- Confirm the certificate is in the user/device Machine certificate store. (In our case, I selected the User authentication, so the certificate will be stored under “user certificates on the machine”)
Wi-Fi Profile & Connection Test
- Confirm the Wi-Fi profile is applied on the device (Settings > Network > Wi-Fi).
- Connect the test device to the SSID – it should authenticate automatically with no password prompt.
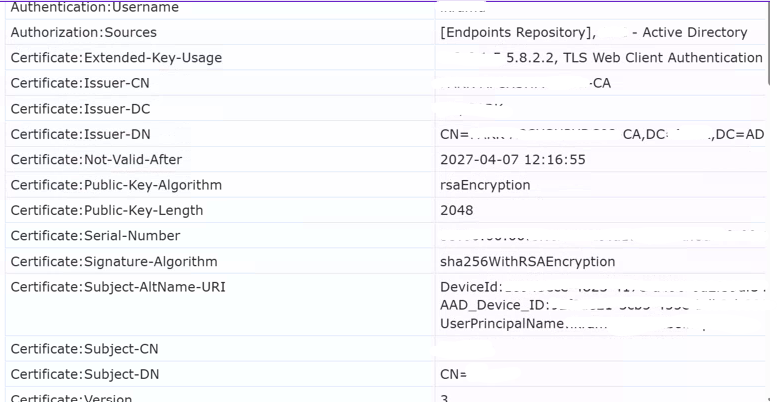
- Check ClearPass Access Tracker (Monitoring > Live Monitoring > Access Tracker) – auth should show as EAP-TLS with a positive result.
- Verify the correct VLAN or role is assigned to the device.
Certificate Revocation Test
- Revoke the test device certificate on your CA.
- Wait for OCSP propagation (usually immediate) or CRL update.
- Attempt to reconnect – the connection should be denied.
- Confirm ClearPass Access Tracker shows a certificate revocation failure reason.
Change Management & Operational Notes
Any change to the ClearPass service for this SSID – including authentication rules, enforcement policies, OCSP settings, or node assignments – must be reviewed alongside the Intune Wi-Fi profile, SCEP profile, and wireless controller SSID settings. These components are tightly coupled. A change in one layer often requires updates in the others.
Post-Change Testing
After any ClearPass or Intune configuration change, schedule a follow-up test session to run end-to-end validation before closing the change. This is especially important after OCSP/CRL or certificate template changes.
Troubleshooting Quick Reference
| Common Issues & Resolutions | |
| Issue | Likely Cause & Resolution |
| Device not receiving certificate | NDES unreachable or connector offline. Verify NDES URL from device browser. Check connector status in Intune. |
| Wi-Fi profile not connecting | Certificate not yet deployed. Check profile assignment order – Trusted Cert and SCEP profiles must deploy before the Wi-Fi profile. |
| EAP-TLS fails in ClearPass | CA trust not imported. Go to ClearPass Trust List and ensure the issuing CA certificate chain is present. |
| OCSP check fails | ClearPass cannot reach OCSP responder. Check firewall rules and test connectivity from the ClearPass CLI. |
| Revocation not enforced | OCSP set to optional. Change OCSP verification to Required in the EAP-TLS authentication method. |
| Device connects but gets wrong VLAN | Enforcement policy rule mismatch. Review ClearPass enforcement policy conditions and certificate attribute mapping. |
| Certificate expired, device locked out | Renewal profile missing. Ensure the SCEP profile has a renewal threshold set (e.g., 20% remaining validity). |
| CRL download fails | CA publishing to LDAP only. ClearPass requires HTTP for CRL. Republish CRL to an HTTP distribution point. |
Conclusion
Certificate-based Wi-Fi authentication with EAP-TLS, powered by Intune SCEP and Aruba ClearPass, is one of the most robust network access control implementations you can build in a modern enterprise. When combined with real-time revocation checking via OCSP and CRL, you have a system that not only prevents unauthorized access but can also instantly cut off compromised or decommissioned devices.
The deployment spans several moving parts – NDES, the Intune Certificate Connector, SCEP profiles, the Intune Wi-Fi profile, ClearPass services, and your wireless infrastructure. The Wi-Fi profile is the often-missed final piece that instructs devices to actually use the certificate for authentication. When all components are properly configured and tested end-to-end, users get a seamless, password-free connection experience while the network enforces the highest level of access control.
If you are planning a similar deployment, use this guide as your reference. Test OCSP and CRL connectivity thoroughly before go-live, coordinate changes across all three layers, and always validate end-to-end after any configuration change.